
As you noticed in my last post, I've got a watermark now! I'm not TOO worried about people stealing my images, since they're not as super fantastic as other bloggers out there, but I thought it would be cool to have one, and I can have copyright information for Stampin' Up images like I'm supposed to. I used Photoshop Elements 4.0 to create it, following the tutorial put together by Kurtis Amundson, otherwise known as Stampin' Kub. He's quite talented in all things stamping (puts me to shame big time). But of course why wouldn't he be, his mother's a Stampin' Up! demo!! His website is wonderful, and I am inspired everytime I visit. Take a look for yourself! His video on creating a watermark is in the Tutorial Section under "Tips".
Stampin' Kub
Thursday, May 24, 2007
Totally Cool Triangle Sketch
Sketch Challenge #124 over at Splitcoast was so interesting, I've made three so far. The first one I did was for my grandmother, but the picture was so awful I don't want to post it here, and since I don't have it anymore, I can't reshoot. But since then I have made two others that came out better anyway.
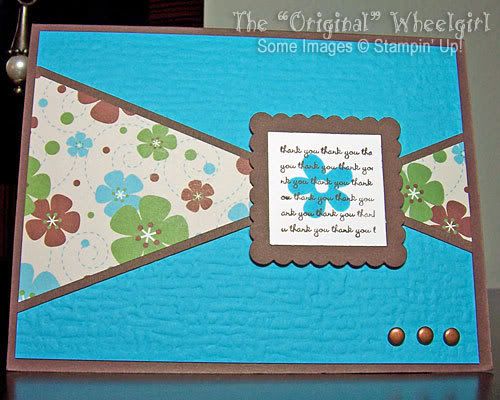
The best way to go about doing this sketch is to start with your scrapbook paper cut at 3 3/4" by 5". Flip it over to the back, and make a mark on one short end 1/2" from the top and from the bottom. On the other short end, make a mark 1 1/4" from the top and from the bottom. Connect the top mark on one side to the bottom mark on the other side, and do the opposite going the other way to make an X. Cut apart on these lines, and you have your two triangles! I matted these triangles 1/8th " on the two long sides of each triangle, with the short side flush. Then on a 4" x 5 1/4" panel I centered the triangles facing each other. There is a slight overlap which you could trim, but since you will be covering it with your focal image, it doesn't really matter. This panel is then attached to a regular size card base (4 1/4" x 5 1/2"). I hope this makes sense.
The card below was made using Tempting Turquoise and Chocolate Chip cardstock, to go with the scrapbook paper I got in the Die Cuts With A View 4x6 Retro pad. The turquoise panel is Cuttlebugged using the "fabric" Fiskars Texture Plate, and attached to a Choco Chip card base. The focal image is made using the flower and Thank You background stamps from the Mini Messages set by Stampin' Up! I used Tempting Turquoise ink for the flower and Chocolate Chip ink for the background Thank You's on Whisper White cardstock. I punched this image out using my 1 1/4" square punch and matted it with a Marvy Mega scallop square in Chocolate Chip. I attached the focal image using dimensionals. I just love this color combo!
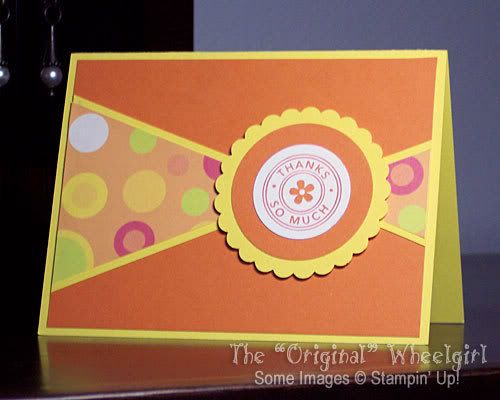
I liked this sketch so much that I made another card using the sketch and also for the Ways to Use It challenge for the week (WT114) which was to use of all things, YOYO YELLOW! Yuck! Not my bag, so I made it a secondary color for this card, which is mainly Pumpkin Pie! I stamped the Thanks So Much stamp from the Riveting set by Stampin' Up! in Pumpkin Pie on Whisper White cardstock and punched it out with the 1 3/8" circle punch, matted it with a Super Jumbo (blue Marvy punch) circle in Pumpkin Pie and again matted with a Mega Scallop Circle in Yoyo Yellow. The triangles are made using a downloaded digital scrapbook paper from Lettering Delights.com, matted in Yoyo Yellow and placed on a Pumpkin Pie panel and attached to a Yoyo Yellow cardbase. The circle focal image was attached with dimensionals. I probably would have added a touch of Certainly Celery cardstock, but I'm out and need to order more...
This won't be the last sketch like this I'll do, but I like this week's sketch too, so maybe I'll have to move on for a while...LOL!
The best way to go about doing this sketch is to start with your scrapbook paper cut at 3 3/4" by 5". Flip it over to the back, and make a mark on one short end 1/2" from the top and from the bottom. On the other short end, make a mark 1 1/4" from the top and from the bottom. Connect the top mark on one side to the bottom mark on the other side, and do the opposite going the other way to make an X. Cut apart on these lines, and you have your two triangles! I matted these triangles 1/8th " on the two long sides of each triangle, with the short side flush. Then on a 4" x 5 1/4" panel I centered the triangles facing each other. There is a slight overlap which you could trim, but since you will be covering it with your focal image, it doesn't really matter. This panel is then attached to a regular size card base (4 1/4" x 5 1/2"). I hope this makes sense.
The card below was made using Tempting Turquoise and Chocolate Chip cardstock, to go with the scrapbook paper I got in the Die Cuts With A View 4x6 Retro pad. The turquoise panel is Cuttlebugged using the "fabric" Fiskars Texture Plate, and attached to a Choco Chip card base. The focal image is made using the flower and Thank You background stamps from the Mini Messages set by Stampin' Up! I used Tempting Turquoise ink for the flower and Chocolate Chip ink for the background Thank You's on Whisper White cardstock. I punched this image out using my 1 1/4" square punch and matted it with a Marvy Mega scallop square in Chocolate Chip. I attached the focal image using dimensionals. I just love this color combo!
I liked this sketch so much that I made another card using the sketch and also for the Ways to Use It challenge for the week (WT114) which was to use of all things, YOYO YELLOW! Yuck! Not my bag, so I made it a secondary color for this card, which is mainly Pumpkin Pie! I stamped the Thanks So Much stamp from the Riveting set by Stampin' Up! in Pumpkin Pie on Whisper White cardstock and punched it out with the 1 3/8" circle punch, matted it with a Super Jumbo (blue Marvy punch) circle in Pumpkin Pie and again matted with a Mega Scallop Circle in Yoyo Yellow. The triangles are made using a downloaded digital scrapbook paper from Lettering Delights.com, matted in Yoyo Yellow and placed on a Pumpkin Pie panel and attached to a Yoyo Yellow cardbase. The circle focal image was attached with dimensionals. I probably would have added a touch of Certainly Celery cardstock, but I'm out and need to order more...
This won't be the last sketch like this I'll do, but I like this week's sketch too, so maybe I'll have to move on for a while...LOL!
Tuesday, May 15, 2007
Winter Fluffles

I know its spring, and really close to summer, but I chose to do a January themed card for the Year of Fluffles swap being held on Splitcoast, since it was the last spot open in the swap. I used the Snowboard Fluffles stamp, and also the Winter stamp from the Season by Season set by Stampin Up! I colored him in with So Saffron, Brocade Blue, and Bashful Blue markers, and used Julie Buhler's technique for making a scalloped circle using the small corner rounder and Night of Navy cardstock. (Julie, I hope you don't mind me linking to your website. I'm a huge fan!)
For the background I ran Brocade Blue cardstock through my Cuttlebug using the Fiskars snowflake texture plate and notched the corners with the ticket corner punch. I stamped "Winter" on a scrap of white, and scraped the edges on the Night of Navy pad to define the edges. I glued a piece of navy grosgrain around the background piece and attached the Winter piece with glue dots and added a special brad. I attached the Fluffles focal image using pop dots for dimension. I used Sticky Strip to attach the whole thing to a Night of Navy card base because the embossed background needed extra hold. And thats about it. Oh by the way, I made twelve of these...WHEW!
Sunday, May 13, 2007
Happy Mother's Day!

Happy Mother's Day to all the moms out there! This year I gave my mom a gold bangle bracelet, and I made a gift bag out of Certainly Celery cardstock using the pattern that was in PaperCrafts magazine a while back and was also Technique Challenge #102. The center panel uses one of the green papers from the Palette O' Prints pack available now from Stampin' Up. I used brown grosgrain ribbon I got at Michael's for the handles and attached it with Sticky Strip to make sure it stuck. The bag was also put together with the same sticky tape. I was happy to see I had matching green brads to add to the top of the bag on the ribbon! I made a matching card using the same colors and paper and the Sketch Challenge 105 (one of my favorites!), with a bit of Chocolate Chip cardstock for the matting. I used the Happy Mother's Day stamp from All Year Cheer II (too bad its retiring) in Chocolate Chip ink on Whisper White cardstock and punched it out with my Mega scallop oval punch and matted it in Chocolate Chip with the Giga scallop oval. Mom was thrilled!
Wednesday, May 09, 2007
Olive Polished Stone Tree
This past weekend, as we counted the hours until Dexter could get that stupid cone off (see this post) Mom and I decided we would take our minds off it by doing a technique that I had been wanting to try, but hadn't got around to, the Polished Stone Technique. I used Old Olive, Mellow Moss, and Certainly Celery to do the background using the technique (no metallic inks) after I embossed the tall pine tree from the Lovely as a Tree set by Stampin' Up! with clear embossing powder on glossy cardstock.
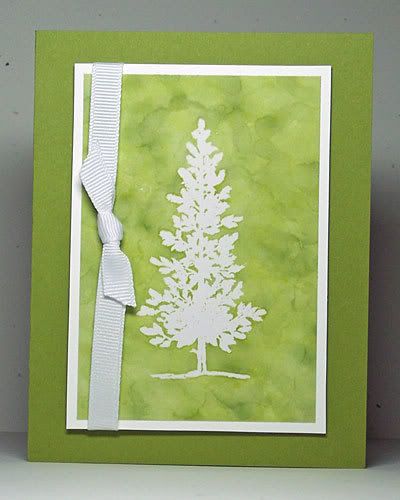
As the ink dried, I noticed that the embossing was starting to peel away, so I thought it should be removed totally, so I had Mom iron it off between sheets of typing paper. It turned out so well if I do say so myself! I matted it with white so the white tree would "pop", tied white grosgrain ribbon along the side, and attached the image to an Old Olive card base with Stampin' Dimensionals (foam pop dots).
We liked this so much, I made two other images using the same technique with different stamps and ink colors, but haven't made any cards from them yet. But stay tuned...they are coming!
My Little Bobcat
I haven't posted in a while. I've been pretty busy and also a bit down. A few weeks ago my kitty Dexter had a biopsy on a lump on his tail and it came back as a malignant tumor. Needless to say I was devastated. He is only six years old! The vet recommended that his tail be amputated as there was no guarantee they could get all of it otherwise. So two weeks ago we took him to a specialist surgeon in Maitland (north of Orlando where I live) and they amputated all but about three inches of his tail. I cried that whole day.
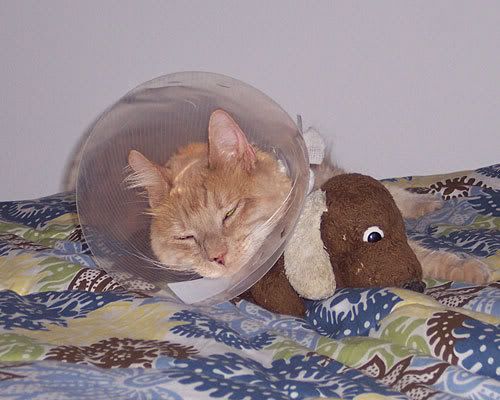
They kept him overnight for observation, and the next day we went to get him. He had to wear what they call an e-collar (but we called it the Cone of Doom) until his sutures were removed, which was this past Monday. He hated every minute of it, but came to accept it after a couple of days. He couldn't bathe himself that whole time, and kept trying to, but all he could lick was the inside of the cone. Poor thing.
But the cone is off! And now we just have to wait for the fur to grow back on his tail and pray that the cancer didn't get a chance to spread. We go back in three months for a check up then every three months after to keep an eye on him. He is my little boy and I am not ready to lose him.
Subscribe to:
Posts (Atom)